



Neon signs are easily one of the best ways to upgrade a room. Whether you want to add a warm, colorful glow to your living room or set up a bold background for your shop, bright signage changes the whole feel of a space instantly. Modern LED neon signs are light, energy-efficient, and a lot safer than old-school glass neon tubes. Still, once your sign arrives in the mail, figuring out how to put it up can feel a bit tricky. Knowing how to install a neon sign properly makes sure it stays safe on your wall and looks great for years.
If you do not use power tools very often, hanging wall decor can seem overwhelming. The good news is that neon sign installation is actually pretty easy once you know the basic steps. In this guide, we will break down everything you need to know, from picking the right spot to mounting your sign cleanly on drywall, wood, or brick.
Popular Products












Why Neon Signs Are Such a Great Choice for Walls
Empty walls often feel incomplete when you only hang basic pictures or standard light fixtures. Modern neon signs bring bright color and real personality into any room. Old glass signs needed heavy high-voltage transformers and delicate glass tubes, but modern LED versions use tough acrylic backings and simple plug-in power units.
Make the Space Yours with a Custom-Made Neon Sign
Personalization is a huge reason these signs are so popular right now. A custom-made neon sign lets you turn your favorite phrase, family name, or quote into bright artwork. If you run a business, custom logo neon signs give you a quick way to turn plain walls into branded photo spots that customers love sharing online. A stylish business neon sign catches eyes and builds brand recognition, while a home neon sign brings a warm, cozy feel to game rooms, bedrooms, or dining spaces.
Tools Needed to Install a Neon Sign
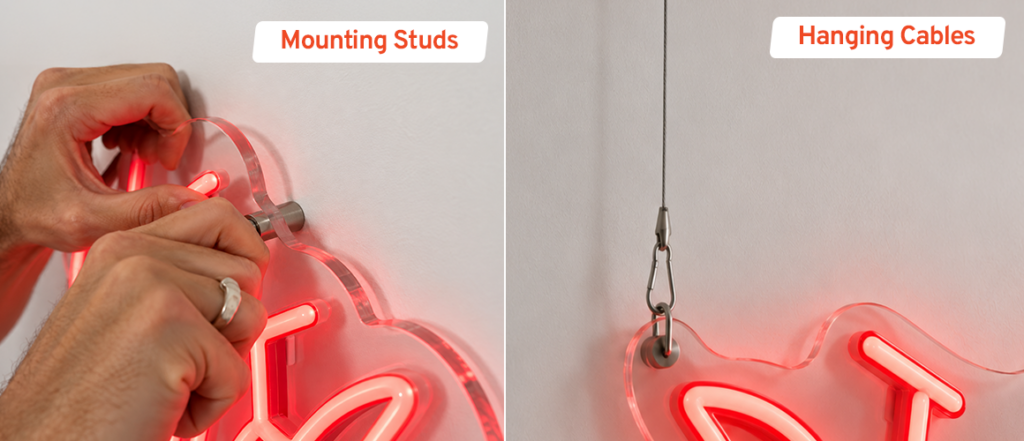
Getting all your gear ready before you start saves you time and keeps things running smoothly. Here is what you will need when setting up your tools needed to install a neon sign.
Read Also: Everything You Need to Know About LED Neon Signs
Standard Mounting Hardware
If you get your sign from reliable makers like BannerBuzz, most of the standard hardware comes right in the package. Here is what you will usually use for a solid, permanent setup:
- Neon sign mounting hardware: Metal standoff barrels, hollow wall anchors, screws, and small rubber washers. Standoffs hold the sign slightly away from the wall, creating a neat floating look with nice shadow depth.
- Electric Drill and Drill Bits: Necessary for making clean pilot holes in drywall, wood, or masonry.
- Hand Level or Bubble Level: Makes sure your sign sits completely straight so it never looks crooked.
- Tape Measure and Pencil: Helps you measure distances accurately and mark your drill spots.
- Painter’s Tape: Useful for holding paper layout templates against the wall before you drill.
- Screwdriver: A basic Phillips head screwdriver for tightening anchors and screws.
No-Drill Options for Hanging
If you are renting, setting up a temporary display for a trade show, or just do not want to drill holes in your wall, you have a few options:
- Heavy-Duty Adhesive Strips: Strong mounting strips that stick directly onto flat surfaces without damaging paint.
- Hanging Wire or Chains: Great if your neon sign has pre-drilled holes at the top for hanging from ceiling hooks or grid racks.
Where to Place a Neon Sign on a Wall
Finding the right spot for where to place a business neon sign on a wall comes down to three things: good visibility, room balance, and proximity to an outlet. A well-placed sign naturally pulls the room together, while a poorly placed one can look cramped or cause glare.
How High Should You Hang a Neon Sign?
A question people ask all the time is: how high should you hang a neon sign? A reliable rule of thumb is to aim for the center of the sign to sit about 57 to 60 inches off the floor. This puts it right around eye level, which is standard for art galleries.
If you are placing it near furniture, adjust the height slightly:
- Above a Couch or Bed: Keep the bottom edge of the sign 8 to 12 inches above the top of the furniture. This gives it breathing room and keeps people from bumping their heads.
- Behind a Desk or Bar Counter: Mount it high enough so people standing or sitting nearby do not block the light.
Outlets and Cord Setup
Keep in mind that LED neon signs need to plug into power. Check where your nearest plug is before making any marks on the wall. Make sure the cord reaches comfortably without pulling tight. To keep things looking tidy, you can use low-profile wire covers or cable clips to route the cord straight down the wall.
Step-by-Step Guide: How to Install a Neon Sign
Now that you have picked your spot and gathered your gear, here is how to get the sign up. Pick the method below that works best for your setup.
Method 1: Wall-Mounted Neon Sign Using Standoffs
Using metal standoffs gives your sign a clean, professional look. It is the most popular way to install acrylic-backed neon signs.
- Prep the Wall: Wipe down the wall area with a dry cloth. Have someone hold the sign where you want it, or tape up the paper template if your sign came with one. Use your level to make sure it is straight.
- Mark Your Spots: Take a pencil and mark through the pre-drilled holes in the acrylic backing straight onto the wall.
- Drill the Pilot Holes: Set the sign down somewhere safe. Drill pilot holes into your pencil marks using a drill bit that matches the size of your wall anchors.
- Put in Wall Anchors: Tap your plastic drywall anchors gently into the drilled holes until they sit flush with the wall.
- Install the Standoff Bases: Unscrew the top caps from your standoff barrels. Put a screw inside the hollow standoff tube and drive it into the wall anchor with your screwdriver. Do this for all mounting spots.
- Mount the Sign: Hold the sign up so the pre-drilled holes align with the standoff bases on the wall. Place a soft rubber washer against the front face, then screw the standoff caps back on by hand until snug.
- Plug It In: Connect the main power wire from your sign to the adapter box, plug it into the outlet, and turn it on.
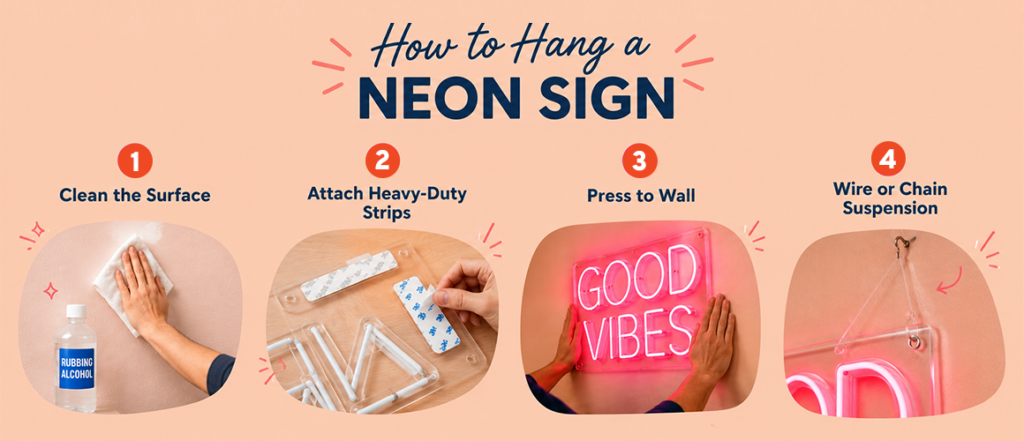
Method 2: How to Hang a Neon Sign Without Damaging the Wall
If you live in a rental or need a temporary setup for an event, knowing how to hang a neon sign without damaging the wall is key. Lightweight LED signs make this method super simple.
- Clean the Surface: Clean the wall area with rubbing alcohol and let it dry completely. Dirt or dust keeps adhesive strips from sticking properly.
- Attach Heavy-Duty Strips: Use strong adhesive strips rated for the weight of your sign. Stick them onto the flat acrylic backer, press firmly for 30 seconds, and peel off the backing paper.
- Press to Wall: Hold the sign firmly against the wall for about 60 seconds. Give the adhesive time to bond before turning on the power supply.
- Wire or Chain Suspension: You can also run clear fishing line or small S-hooks through the top holes on the acrylic backing and hang the sign from existing wall hooks or ceiling mounts. Learning how to hang a neon sign this way gives you a floating, floating look without making big holes in the wall.
Simple Safety and Care Tips
Modern LED signs run cool and are built sturdily, but a few basic tips will help keep your sign working smoothly for a long time:
- Keep Indoor Signs Inside: Unless your sign is explicitly rated for outdoor use, keep it away from moisture, rain, or damp spots.
- Stick to the Included Power Unit: Always use the power brick supplied with your sign to avoid electrical surges or short circuits.
- Keep Cords Tucked Away: Make sure hanging wires are secured so kids or pets do not accidentally pull on them.
- Turn Off Before Cleaning: Unplug the power adapter before wiping dust off the acrylic board with a microfiber cloth.
Read More: How to Choose the Perfect Business Neon Signs
Enjoy Your New Glowing Wall Decor
Setting up new lighting in your home or shop does not need to feel complicated. Following these simple steps for how to install a neon sign gets your piece up safely in less than half an hour. Grab your tools, pick out a great wall spot, and enjoy the new mood your sign brings to the space!
Frequently Ask Questions
Q1. How do you install a neon sign on a wall?
Ans. To install a neon sign, first choose the right location and mark the mounting points. Depending on the wall and sign, you can use standoffs, screws, wall anchors, adhesive strips, or hanging hardware.
Q2. Can you hang a neon sign without damaging the wall?
Ans. Yes. Lightweight LED neon signs can often be hung without drilling by using heavy-duty adhesive strips or hanging wire.
Q3. What tools and hardware are needed to install a neon sign?
Ans. BannerBuzz provides wall mounting and hanging cables for a smooth installation. Other than that, some of the common tools include a drill, screwdriver, tape measure, pencil and level.
Q4. Where is the best place to put a neon sign on a wall?
Ans. The best location is one where the sign is clearly visible, complements the surrounding space, and is close enough to an electrical outlet. Avoid placing it where furniture or other objects block the sign or where moisture could reach it.